Recently I’ve been working on a project utilising ATTiny85 microcontrollers and Arduino. At first glance it wasn’t obvious if it was possible to use the AVR Dragon with Arduino or macOS High Sierra, but after some trial and error it turns out the Arduino toolchain supports programming via ISP on the Dragon quite well!
In addition to ISP programming on macOS, there was an extra step required to to power the ATTiny from the Dragon, I have covered that below.
macOS, Dragon, ATTiny, Arduino in 2018
Current production versions of the Arduino IDE (1.8.5), it’s bundled version of avrdude (modified 6.3) and ATTinyCore (1.1.5) all work ‘out of the box’ and macOS High Sierra (10.13.5) requires no additional kernel extensions or drivers to use the Dragon, unlike the ATMEL ICE.
Easy to find articles on running the Dragon on macOS were written prior to the renaming of Mac OS X to macOS (2016) and the addition of the Library Manager and Board Manager in Arduino 1.6.x (early 2015). James Gregson (2012) and Jay Wiggins (2015) write about using the Dragon on Mac OS X and demonstrate the installation of avr toolchain components like avrdude, avr-libc, and avr-crosspack via homebrew rather than using Arduino.
Jay mentions as a foot note, the possibility of requiring a custom kernel extension to run the Dragon since the ATMEL ICE requires one. This looked sensible given the ATMEL ICE’s requirement but it is unnecessary. From my experience the Dragon does not require a custom kernel extension to operate on a mac.
Setup Arduino, ATTinyCore
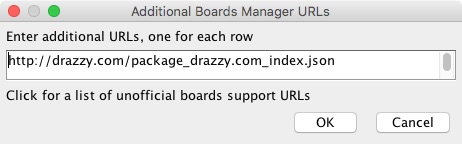
Download the Arduino IDE package from arduino.cc and add ATTiny support with SpenceKonde/ATTinyCore using the “Additional Boards Manager URLs” setting. ATTinyCore has detailed installation instructions.
While you’re in settings enable “Show verbose output during: upload” to see more output when Arduino is interacting with the Dragon via avrdude.

Using AVR Dragon as a Programmer
Note: The Dragon will not appear as an option in the list of available ports like you would see an Arduino Uno or a USB serial programmer.
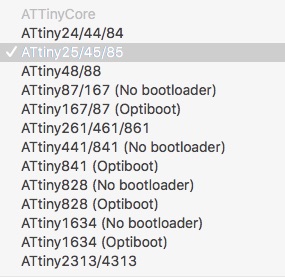
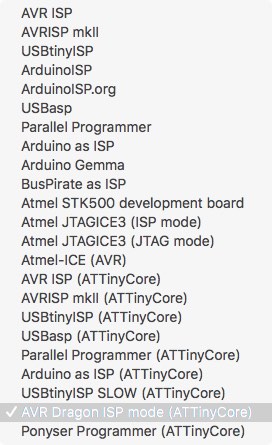
Open a project you’d like to flash to your ATTiny, from the Tools menu set the appropriate board (ATTiny 25/45/85) and select the programmer “AVR Dragon ISP mode (ATTinyCore)”.
Select “Upload” and if you’ve set verbose mode as highlighted above, you’ll see all the verbose output from Arduino (avrdude) communicating with the Dragon.
A basic command to test the Dragon’s connectivity would be:
~/Library/Arduino15/packages/arduino/tools/avrdude/6.3.0-arduino9/bin/avrdude \
-C ~/Library/Arduino15/packages/ATTinyCore/hardware/avr/1.1.5/avrdude.conf \
-p attiny85 -vvvv -c dragon_isp -P usb
The output with -vvvv is very verbose. The number of vs can be reduced.
Setting Fuses
ATTiny85 doesn’t use a bootloader like a normal Arduino, but the “Burn Bootloader” item in the Tools menu can be used to set fuses. Read the descriptions on the different ATTiny fuses over on the ATTinyCore README.
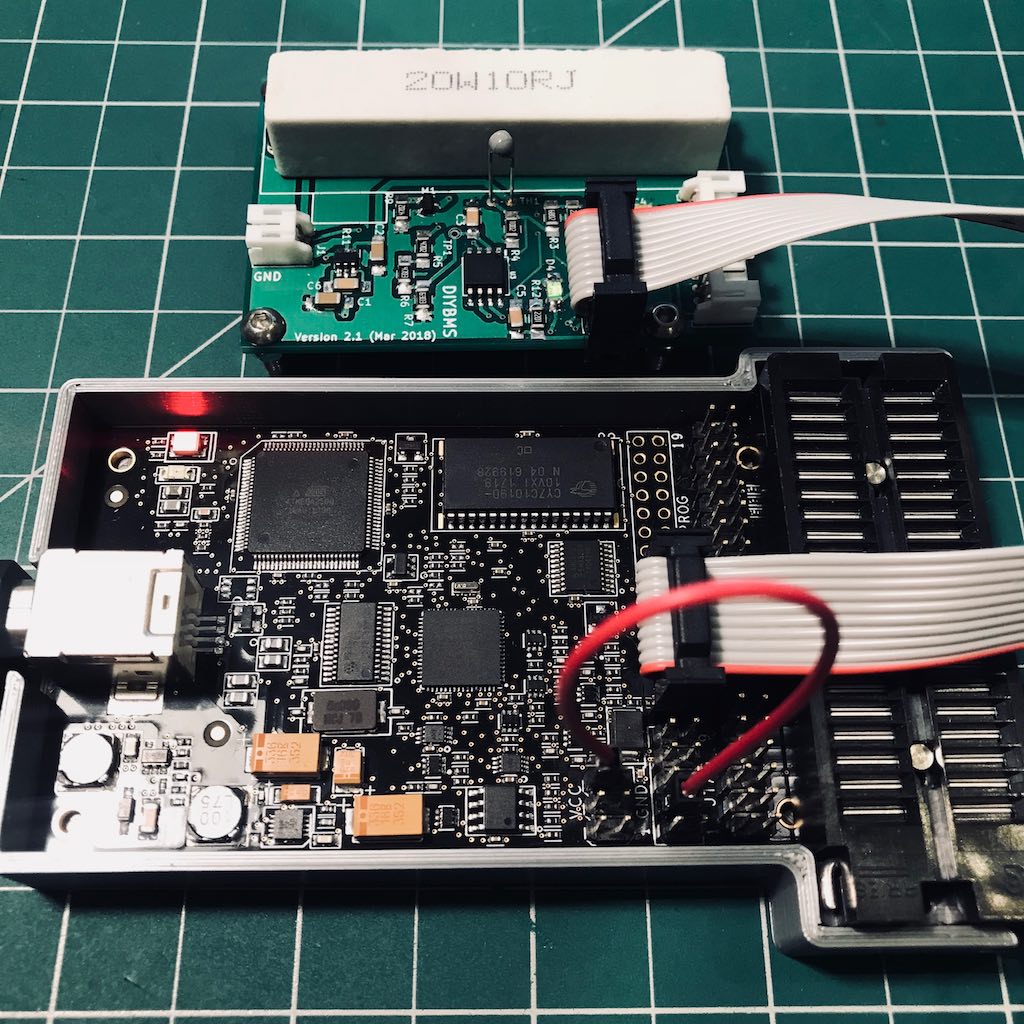
Powering ATTiny from Dragon
Given my ATTiny chips don’t have their own power source, after connecting the ISP headers of the Tiny’s board and attempting up upload via Dragon I encountered this error:
avrdude: jtagmkII_setparm(): bad response to set parameter command: RSP_NO_TARGET_POWER
An article by Josh Levine shows an easy way to provide power to the ATTiny via the ISP cable by placing a jumper from one of the the Dragon’s VCC pins to the unutilised JTAG pin 4. A continuity test with a multimeter shows JTAG pin 4 and SPI pin 2 are connected.
The image below shows a simple jumper from VCC to JTAG pin 4.
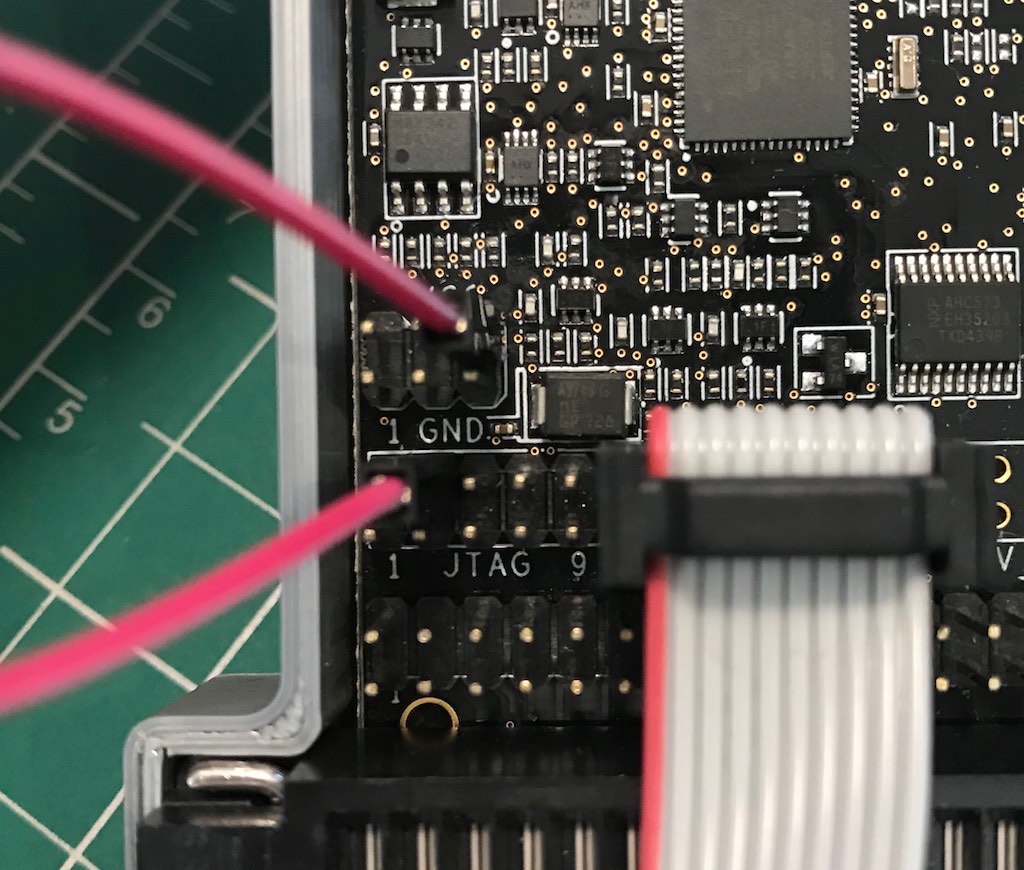
In hindsight, section 4.5 on SPI programming in the Dragon User Guide mentions this power requirement since my ATTiny is essentially ‘on board’:
AVR Dragon must sense the target voltage on pin 2 on the SPI header in order to set up the level- converters. For on-board targets, the voltage must be supplied from pin 2, 4, 6 on the VCC header (5V) into pin 2 (VTG) on the SPI header.
Footnote: Updating Dragon Firmware
The current version of AVR Dragon firmware is 7.39. My Dragon purchased June 2018 came with an older version out of the box. As far as I’m aware to update the Dragon’s firmware you will need to use Atmel Studio on a Windows machine or boot up a Windows VM.
I’m unsure whether or not the firmware update is necessary to run the steps above.